The bcm2835 library uses direct memory access to the GPIO and other peripherals. In this chapter we look at how this works. You don't need to know this but if you need to modify the library or access features that the library doesn't expose this is the way to go.
Now On Sale!
You can now buy a print or ebook edition of Raspberry Pi IoT in C from Amazon.
For Errata and Listings Visit: IO Press
This our ebook on using the Raspberry Pi to implement IoT devices using the C programming language. The full contents can be seen below. Notice this is a first draft and a work in progress.
Chapter List
-
Introducing Pi (paper book only)
-
Getting Started With NetBeans In this chapter we look at why C is a good language to work in when you are creating programs for the IoT and how to get started using NetBeans. Of course this is where Hello C World makes an appearance.
-
First Steps With The GPIO
The bcm2835C library is the easiest way to get in touch with the Pi's GPIO lines. In this chapter we take a look at the basic operations involved in using the GPIO lines with an emphasis on output. How fast can you change a GPIO line, how do you generate pulses of a given duration and how can you change multiple lines in sync with each other? -
GPIO The SYSFS Way
There is a Linux-based approach to working with GPIO lines and serial buses that is worth knowing about because it provides an alternative to using the bcm2835 library. Sometimes you need this because you are working in a language for which direct access to memory isn't available. It is also the only way to make interrupts available in a C program. -
Input and Interrupts
There is no doubt that input is more difficult than output. When you need to drive a line high or low you are in command of when it happens but input is in the hands of the outside world. If your program isn't ready to read the input or if it reads it at the wrong time then things just don't work. What is worse is that you have no idea what your program was doing relative to the event you are trying to capture - welcome to the world of input. -
Memory Mapped I/O
The bcm2835 library uses direct memory access to the GPIO and other peripherals. In this chapter we look at how this works. You don't need to know this but if you need to modify the library or access features that the library doesn't expose this is the way to go. -
Near Realtime Linux
You can write real time programs using standard Linux as long as you know how to control scheduling. In fact it turns out to be relatively easy and it enables the Raspberry Pi to do things you might not think it capable of. There are also some surprising differences between the one and quad core Pis that make you think again about real time Linux programming. -
PWM
One way around the problem of getting a fast response from a microcontroller is to move the problem away from the processor. In the case of the Pi's processor there are some builtin devices that can use GPIO lines to implement protocols without the CPU being involved. In this chapter we take a close look at pulse width modulation PWM including, sound, driving LEDs and servos. -
I2C Temperature Measurement
The I2C bus is one of the most useful ways of connecting moderately sophisticated sensors and peripherals to the any processor. The only problem is that it can seem like a nightmare confusion of hardware, low level interaction and high level software. There are few general introductions to the subject because at first sight every I2C device is different, but here we present one. -
A Custom Protocol - The DHT11/22
In this chapter we make use of all of the ideas introduced in earlier chapters to create a raw interface with the low cost DHT11/22 temperature and humidity sensor. It is an exercise in implementing a custom protocol directly in C. -
One Wire Bus Basics
The Raspberry Pi is fast enough to be used to directly interface to 1-Wire bus without the need for drivers. The advantages of programming our own 1-wire bus protocol is that it doesn't depend on the uncertainties of a Linux driver. -
iButtons
If you haven't discovered iButtons then you are going to find of lots of uses for them. At its simples an iButton is an electronic key providing a unique coce stored in its ROM which can be used to unlock or simply record the presence of a particular button. What is good news is that they are easy to interface to a Pi. -
The DS18B20
Using the software developed in previous chapters we show how to connect and use the very popular DS18B20 temperature sensor without the need for external drivers. -
The Multidrop 1-wire bus
Some times it it just easier from the point of view of hardware to connect a set of 1-wire devices to the same GPIO line but this makes the software more complex. Find out how to discover what devices are present on a multi-drop bus and how to select the one you want to work with. -
SPI Bus
The SPI bus can be something of a problem because it doesn't have a well defined standard that every device conforms to. Even so if you only want to work with one specific device it is usually easy to find a configuration that works - as long as you understand what the possibilities are. -
SPI MCP3008/4 AtoD (paper book only)
-
Serial (paper book only)
-
Getting On The Web - After All It Is The IoT (paper book only)
-
WiFi (paper book only)
Accessing the hardware directly isn't something that everyone wants or needs to do but knowing how it all works gives you a different perspective. It means you can think about what you are doing, even if is only using the BCM2835 library in a broader and deeper way. In this chapter we look in more detail at the GPIO, its hardware and how it is controlled by the software. In particular we look as the ingenious method that Linux uses to allow you to access peripherals or any memory you want to. This is useful in a wider context because you can use the same techniques to map any file into memory. The same techniques can be used to work with other hardware in the bcm2835 that perhaps the library doesn't cater for.
All of the peripherals that are directly connected to the processor are memory mapped. What this means is that there are a set of addresses that correspond to "registers" that control and give the devices status. Using these is just a matter of knowing what addresses to use and what the format of the registers is and how to directly use memory under Linux.
Easy to say - slightly more difficult to get right.
However after you have got it right you can't understand what the fuss was about.
The best way to understand how all of this works is to find out about a particular peripheral - the GPIO.
The GPIO Registers
If you look at the manual for the BCM2835 processor you will find a long section on the registers that are connected to the GPIO lines. This looks very complicated but in fact it comes down to a very simple pattern.
There are 54 GPIO lines arranged as two banks not all usable on the Pi.
For each GPIO line there is a three bit configuration code that sets it to input or output or one of the alternate functions:.
000 = GPIO Pin is an input
001 = GPIO Pin is an output
100 = GPIO Pin takes alternate function 0
101 = GPIO Pin takes alternate function 1
110 = GPIO Pin takes alternate function 2
111 = GPIO Pin takes alternate function 3
011 = GPIO Pin takes alternate function 4
010 = GPIO Pin takes alternate function 5
These three bits are packed into five 32 bit function select or configuration registers. The first function select register holds the configuration bits for GPIO 0 to 9 i.e. 10 GPIO lines with GPIO 0 as the first three low order bits and GPIO 9 as the bits 27, 28 and 29. Bits 30 and 31 are unused in each of the registers.
The first register is:

Basically the three configuration bits are packed into the 32 bit registers as best they can be. This arrangement continues for the next four registers, which control ten GPIO lines each, but the fifth register only holds the configuration bits for GPIO 50 to 53 and bits 12 to 31 are unused.
Packing 54 GPIO lines into multiples of 32 bits is always going to leave some bits over.
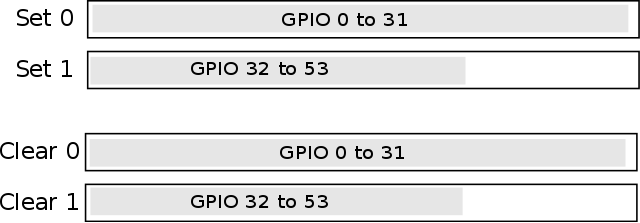
Once the GPIO lines are configured into either input or output you can use the set and clear registers to set them high or low and the Level registers to read the state of inputs.
There are two Set and two Clear registers.
The first register of each pair controls GPIO lines 0 to 31 and the second pair controls GPIO lines 32 to 53. One bit is assigned per line and the second register of each pair has bits 22 to 31 unused. That is bit zero in Set 0 or Clear 0 controls GPIO 0 etc.
If you write to either register then the lines that correspond to one bits are set or cleared according to which register you write to. There is no simple Out register that you can write to simultaneously set and clear bits. The reason is that you can use Set and Clear to set or clear any GPIO lines without changing the state of the others.
For example suppose you want to set GPIO 0 to a one then you would write 0x01 to the Set 0 register. In this case the zero bits have no effect. A general Out register would also set all of the other lines it controlled to low in response to the zeros. This means controlling GPIO lines with a general Out register usually involves a read to establish the current state of all of the GPIO lines, then a logical operation to set or clear a particular line followed by a write. Having Set and Clear registers means you can set any group of lines to high or low in one write operation. However what you cannot do is set lines high and low at the same time.
To summarize the main registers controlling the GPIO lines are
FSEL0-FSEL5    configuration registers three bits
               for each GPIO line

SET0     Set any group of GPIO lines high
SET1

CLR0  Set any group of GPIO lines low
CLR1

LEV0  read the state of all GPIO lines
LEV1
There are also pairs of registers that control the event detection and interrupts which follow the description on of the functions in the interrupt section of the previous chapter.
These are:
EDS0  Event detect status
EDS1

REN0 Rising edge detect enable
REN1

FEN0 Falling edge detect enable
FEN1

HEN0 High detect enable
HEN1

LEN0 Low detect enable
LEN1
and two async version of the edge detection enables:
AREN0 async rising edge detect enable
AREN1

AFEN0 async falling edge detect enable
AFEN1
There are also three registers that let you set the pullup/pulldown behavior of any GPIO line:
UD      Pull up/down enable
UDCLK0  Enable clock
UDCLK1
You will notice that unlike the other enable registers there is only a single 32 bit Pull up/down register to control 53 GPIO lines. In fact only the first two low bits control anything.
b1 b0
 0   0   push pull
 0   1   pull down
 1   0   pull up
 1   1   reserved
To set which GPIO line the new state refers to you have to use the UDCKL pair of registers. The procedure is surprisingly complicated.
- set the state required in the UD register
- wait 150 clock cycles for the hardware to settle
- write a 1 to each bit position in UDCKL0/1 to determine which GPIO lines the new state will apply to.
- wait 150 clock cycles for the hardware to settle
- write all zeros to UD and UDCKL0/1 to clear the set state
The bcm2835 library provides functions that expose this clocking procedure and a function that hides it from you. The
bcm2835_gpio_set_pud (uint8_t pin, uint8_t pud)
function simply sets the pin you select to the specified pullup/down.
There is one more set of registers to consider that it not listed in the standard documentation for reasons that are not clear. There are three PAD registers that set the fine details of the GPIO drive. You can consider the PAD registers as additional to the PUD registers. The three registers control groups of GPIO lines:
PAD0 GPIO 0 -27
PAD1 GPIO 28-45
PAD2 GPIO 46-53
The configuration is set in bits 0 to 5:
bits 2,1 0   Drive Strength
000            = 2mA
001            =4mA
n                =(n+1)*2mA
bit 3 controls hysteresis 0 = disabled 1= enabled
bit 4 controls slew rater 0=slew rate limited 1 = slew rate not limited.
The top 8 bits of the PAD registers has to be set to 0x5A to allow the PAD register to be written to. This is misleadingly called a PASSWRD.
There isn't much documentation on hysteresis and slew rate but broadly speaking hysteresis makes the input a schmitt trigger and slew rate puts a small capacitive load on the input.
The Drive Strength setting deserves explanation. This isn't the amount of current that the pin can supply. It is the effective output resistance. Each time the drive current is increased by 2mA another transistor is used in the drive so lowering the output resistance. This has the effect of increasing or decreasing the voltage.
This is a subtle idea and related to how much current is needed to make the output 3.3V or 0V. For example, if you have a 2mA drive current then a load that draws 2mA will have a voltage across it within the tolerance for 3.3V logic. If the load draws more than 2mA then the output voltages will not be high and low enough to meet the tolerances 0.8V for zero and 1.3V for one.
The drive current is not a maximum current that can be supplied and it is certainly not a current limiting value.
If you short an output to 0V or 3.3V then it will supply as much current as it can before overheating and failing.
The power up defaults for PAD registers are Slew rate unlimited, hysteresis enabled and drive 8mA.
- Prev
- Next >>